Easy Faux DIY Shiplap Wall

This easy and affordable faux DIY shiplap wall is budget-friendly and adds so much character! With the right tools and this full tutorial, you’ll be able to create the classic shiplap look.
Shiplap became a staple in farmhouse-style homes when Joanna Gaines introduced it in their show, Fixer Upper. We’ve added it in a few places in our own home, most recently in our oldest son’s bedroom.
As with all DIY projects, there are different ways to achieve the look you want. We had a small budget to work with for his room so we opted to use plywood sheets rather than shiplap planks.
It really cut the cost significantly to do it this way and it’s super easy!
This post contains affiliate links for your convenience. See my full disclosure policy here.
Faux Shiplap Boards with Plywood Strips
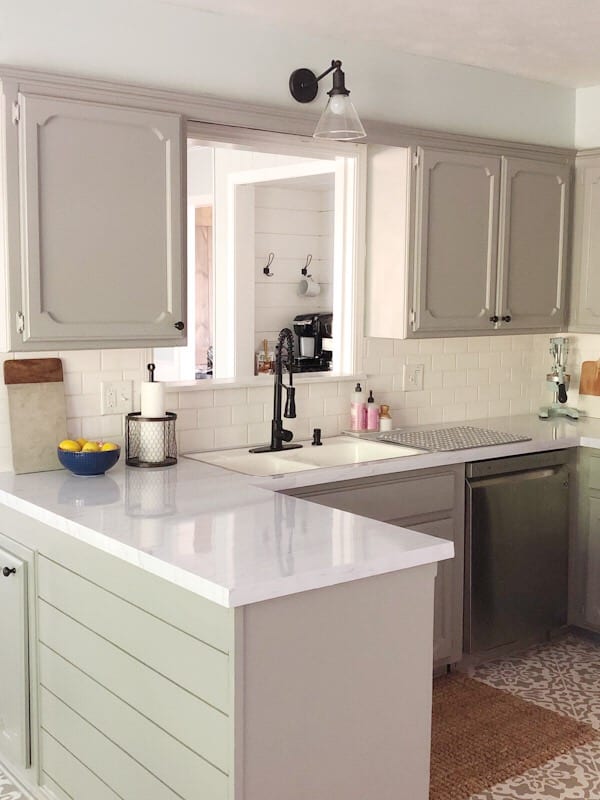
The first time we went the DIY faux shiplap route was when we added it to our kitchen peninsula. We wanted the look of shiplap but didn’t have the money to purchase the real deal.
We decided to go the plywood shiplap route instead. At the time we didn’t have a table saw so we bought a sheet of pine plywood at Home Depot and asked them to cut it for us.
Check your local hardware store for this option if you don’t have a table saw!
You can watch the video tutorial for our kitchen shiplap below. Unfortunately we didn’t get video doing the bedroom wall, but this still shows the process!
Easy DIY Shiplap Wall
Use these step-by-step instructions to create your own shiplap wall!
Supply List:
- Table or circular saw
- Plywood
- Painter’s tape
- Stud finder
- Putty knife
- Wood filler
- Chalk line
- Liquid nails
- Laser level
- Nail gun
For our son’s room, instead of doing the whole wall, we decided to go two thirds up the wall and have it act as headboard, too.
Start by measuring the wall to see how much plywood you’ll need. For ours we purchased two pine boards plus a 1×6 pine wood board for the top.
This time around we used the table saw I purchased for my hubby for Father’s Day last year and ripped the boards down ourselves. If you’re in the market for a table saw, I highly recommend this Craftsman table saw from Lowe’s!

Prep Work
For our design plan we decided to go with horizontal planks. Decide how wide you want your shiplap to be. We wanted a six-inch-wide shiplap so we used a ruler to mark the plywood every six inches on the end of the board with a pencil.
The easiest way to get straight lines for your boards is to use a chalk line to mark the plywood where you make your pencil marks.
Line the board up on the table saw where your chalk line is and carefully run the length of the plywood until all the pieces are cut.
Using a stud finder, find the wall studs in the wall where you will be installing the shiplap and mark the wall.
Remove any outlet covers, as well as the covers from your light switches. It’s also a good idea to remove the old baseboards.
We did not do this, but it would’ve looked more professional if we had. You can either reinstall them when you’re finished or install a new baseboard.
Installing your Faux Shiplap Wall
Since we were only going two thirds up instead of doing the entire wall, we started the first plank at the bottom of the wall. If we were doing the whole room we would’ve started at the top of the wall.
The first step is to place the first board on the wall. Use a nail gun to attach the board to the stud in the wall. You can also use liquid nails if you want to avoid nail holes or in addition to using a nail gun for extra adhesion.

For the next piece we used a small section of the plywood to get that classic nickel gap look. You can also use tile spacers. Install the board above the first row and secure it in place with the nail gun and/or liquid nails.

Keep working in this manner, moving on to the next row until you’ve installed the last shiplap board. For the last board we chose to install a stained pine board in our favorite color to give it a more rustic look.
The plywood wasn’t long enough to go the length of the wall so we knew we’d have a seam. We cut the second board and then had to cut them to size to go the rest of the length of the wall.
We filled the seam with putty and sanded it down evenly so it looked like one seamless piece. We also filled in the nail holes and sanded those, as well.

Painting the Shiplap
The easy way to paint the shiplap would’ve been to use a paint sprayer. But we chose to paint the boards as we went. First thing was to prime the raw wood boards.
Next, we chose a gray color instead of the traditional white paint typically seen on shiplap to paint the wall with two coats of paint.
When you’re finished painting, reinstall the covers on the electrical outlets and light switches.


Where to Install Shiplap
Shiplap is very versatile and can be installed in almost any room. It’s great in a master bedroom or guest bedroom as an accent wall. Add crown molding to give it a more finished look.
We installed a little bit in our coffee nook to replace some outdated wallpaper. You could also use it on the back of a bookcase or hutch.
A black shiplap wall adds drama to a dining room. We also installed it in vertical lines in our main bathroom for a modern farmhouse look.

Easy Faux DIY Shiplap Wall: In Conclusion
We are so happy with the overall look the plywood shiplap wall gave our son’s updated room. For under $100 we were able to achieve a shiplap look for a fraction of the cost.
The gray paint color and stained rustic pine board gives the space a masculine look, perfect for our teenager!